
Industry News
Ultimate Table Saw Calibration Guide: Achieving Precision 90° and 45° Cuts
In professional woodworking, the difference between a high-end finish and a failed joint often comes down to less than a tenth of a millimeter. Achieving this level of accuracy is not an inherent trait of the machine but a result of meticulous Table Saw Calibration. A misaligned saw is more than a quality control issue; it is a primary cause of kickback and workplace injuries, as detailed in the OSHA Woodworking Machinery Safety Standards.
Understanding the mechanical geometry of your equipment is the first step toward Table Saw Calibration. Whether you are setting up a new sliding table saw or maintaining an existing unit, the alignment must follow a logical sequence to avoid stacking errors.
Phase 1: Miter Slot and Blade Parallelism
The foundation of all Table Saw Calibration routines is ensuring the blade is perfectly parallel to the miter slot or the sliding table guide. If the blade is “toed-in” or “toed-out,” the rear teeth will catch the wood as it passes through, causing burning on one side and increasing the risk of kickback.
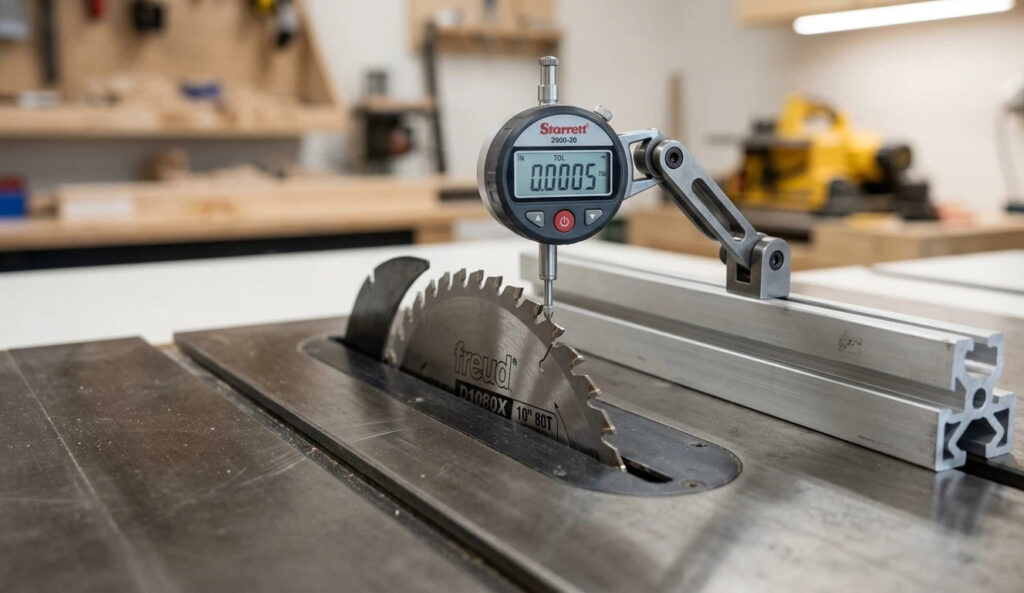
To perform miter slot alignment, you should avoid using a standard tape measure. Instead, use a dial indicator table saw alignment method. Secure the dial indicator in the miter slot and measure the distance to the front and back of the blade. The goal for professional Table Saw Calibration is a variance of less than 0.05mm (0.002 inches), conforming to high-precision requirements set by ANSI/WMMA Woodworking Machinery Standards.
If you detect a discrepancy, you must perform a table saw trunnion alignment. This involves loosening the bolts that secure the saw’s internal carriage and physically shifting the assembly until the blade tracks true to the slots. This is the most critical rule of Table Saw Calibration for longitudinal accuracy.
Phase 2: Squaring the Blade to 90 Degrees
Once parallelism is established, the next core Table Saw Calibration step is saw blade squaring. While many machines have built-in stops, these can shift over time due to vibration or debris buildup.
To achieve precision alignment, do not rely on the machine’s plastic scale. Use a high-quality machinist square or a digital protractor. Check the blade at its highest point of elevation. This is integral to Table Saw Calibration for 90-degree cuts, ensuring that crosscuts are perfectly vertical. If the blade is not square, adjust the internal limit stops until the gap between the square and the blade disappears.
Phase 3: Advanced Calibration for 45-Degree Tilts
Bevel cuts introduce a new variable into the geometry of the machine. Advanced Table Saw Calibration for 45-degree tilts is often required to ensure that miters close perfectly. When the blade tilts, even a slight horizontal misalignment can cause the blade to “arc” away from its intended path.
Using digital table saw calibration tools, such as a digital tilt box, verify the angle of the blade relative to the table surface. This is often overlooked in basic Table Saw Calibration routines, yet it is essential for cabinetry and furniture making. If the 45-degree stop is inaccurate, adjust the tilt limit screw until the digital readout confirms a perfect angle.
Phase 4: Sliding Table and Crosscut Fence Squareness
For owners of sliding table saws, the relationship between the sliding carriage and the blade is paramount. Expanding your Table Saw Calibration to include the sliding table ensures that large panels remain square over long distances.
The crosscut fence squareness must be checked against the path of the sliding table, not just the blade. This process, often called sliding table saw adjustment, involves aligning the fence so it is perpendicular to the travel of the carriage. This completes the Table Saw Calibration workflow for panel processing.
| Calibration Component | Recommended Tolerance | Tool Required |
| Blade Parallelism | < 0.002″ (0.05mm) | Dial Indicator |
| 90° Blade Squareness | Absolute Zero | Machinist Square |
| 45° Bevel Accuracy | +/- 0.1 Degree | Digital Protractor |
| Fence Parallelism | 0.001″ – 0.005″ Tail-out | Precision Straight Edge |
Verification: The 5-Cut Method
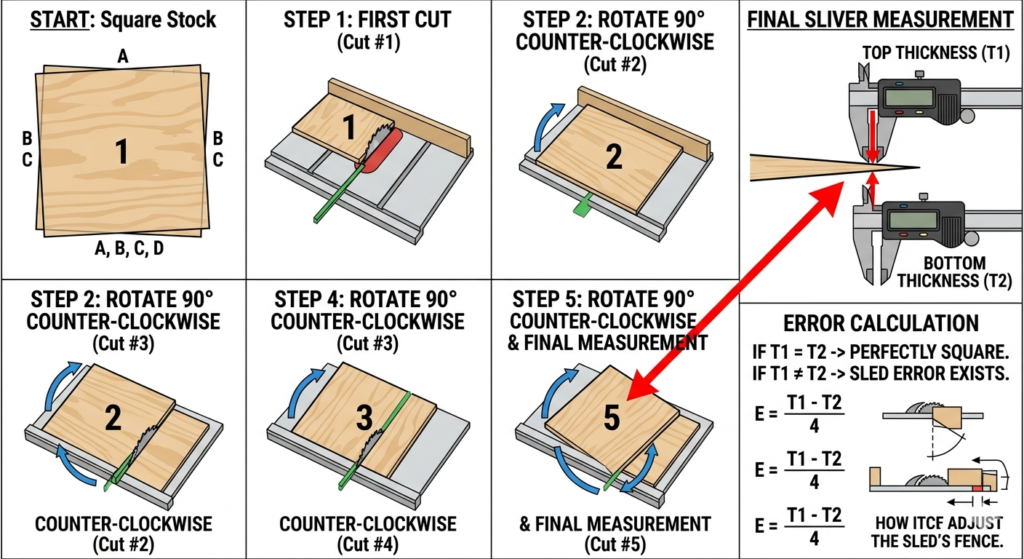
Mastering Table Saw Calibration requires patience and a reliable method of verification. The most accurate way to test your setup is the 5-cut method for crosscut sled accuracy. By taking a square piece of scrap and rotating it 90 degrees for four successive cuts, any tiny error in your fence alignment is magnified fourfold in the fifth “sliver” cut.
Measure the thickness of the front and back of the fifth sliver with calipers. If they are identical, your Table Saw Calibration is perfect. If not, you can use the difference to calculate exactly how much to move your crosscut fence.
Correcting Table Saw Blade Heel
A common issue is the symptoms of misaligned table saw blade, specifically “blade heel.” This occurs when the rear of the blade is slightly closer to the fence than the front. This results in fixing table saw burning on one side of the timber. During your final Table Saw Calibration checks, ensure the fence has a slight “tail-out” (about 0.1mm) at the far end to allow the wood to clear the rear teeth safely.
Regular Table Saw Calibration prevents costly material waste and ensures the longevity of your machine’s mechanical components. By following these steps, you transition from “guessing” to “measuring,” resulting in shop-wide precision.
FAQ
How often should I calibrate my table saw?
For professional shops, a quick check should be done weekly; a full calibration is recommended after every blade change or if the machine has been moved.
Why is my saw cutting “out of square” despite the fence being set?
This is usually due to the blade not being parallel to the miter slots. If the blade isn’t parallel to the slots, the fence alignment will always be inconsistent.
Can I calibrate a saw without a dial indicator?
You can use a feeler gauge and a precision pin, but it is less accurate. For professional results, a dial indicator is the industry standard.
Does the 5-cut method work for the sliding table too?
Yes. Use the same logic on the sliding table crosscut fence to verify it is perfectly perpendicular to the direction of travel.